How to Upload Multiple Html Documents to Website Using Cpanel
Past default, you can build pages and create content within WordPress without ever having to upload whatever custom HTML files. That's because the WordPress core comes with built-in content types. In add-on, the WordPress theme you utilise will likely have its own set of pre-designed folio templates that you lot can take reward of to create a unique website that meets your needs.
Beyond that, there are enough of WordPress landing page plugins you lot can use to create customized page templates for site visitors to land from search results, electronic mail campaigns, and even social media.
So really, there is very little need to upload HTML files to WordPress because, normally, everything you lot need to format your website is already there. That said, in that location are some reasons why you'd want to know how to upload an HTML file to WordPress, some of which get beyond uploading a template for design purposes.
That's why in this mail service, I'll testify y'all how to upload HTML files to WordPress. I'll too discuss in particular why you'll desire to have this skill, so no matter what, you're prepared.
What is an HTML File?
HTML stands for Hypertext Markup Language and was outset developed by Tim Berners-Lee in 1990. In brusk, HTML is the lawmaking used to create electronic documents on the internet, which are better known as webpages. In fact, every webpage you see on the cyberspace was written using HTML code.
The HTML lawmaking on your site'due south spider web pages are responsible for making sure your content's text and images are formatted in the right way.
Without HTML, web browsers would non empathise the manner to visually display the structure of your website for users. However, with the right HTML lawmaking creating the foundation for your webpages, and a little CSS code for calculation in some pattern elements, your website appears perfectly for site visitors.
What is an HTML Template?
And then, you know that HTML is the lawmaking responsible for creating the structure of single webpages on the internet.
But what is an HTML template?
An HTML template is a pre-designed gear up of HTML files that include things similar text, images, and support files for font styles and Javascript. In other words, an HTML template is a pre-fabricated package of HTML code that you can easily upload to your website and utilize.
When you use an HTML template on your WordPress website, you upload the file and plug in the text and images you want the template to display on the front finish of your site.
Information technology'southward important to remember that HTML templates are dissimilar than WordPress themes:
- WordPress Themes: fifty-fifty though you plug in text and images into WordPress themes, they are responsible for the expect and feel of your entire website. Many chemical element changes within your site'due south theme are global, meaning they employ to your entire website.
- HTML Templates: these are standalone zip files that you upload to your website individually. They only affect the expect and feel of a single webpage on your website. In other words, changes you make to i uploaded HTML template will only affect that webpage.
Unfortunately, many people don't sympathise the differences betwixt themes and HTML templates and utilize the terms 'theme' and 'template' interchangeably.
Why Y'all Would Need to Upload an HTML File to WordPress
There are a few specific reasons why yous might want to upload an HTML file to WordPress:
-
- You Have Your Favorites: if you were using a peachy HTML template on an former website and wanted to use information technology on your new site, you might desire to upload the template to your new site rather than re-exercise the unabridged matter. This volition salvage you time and ensure it looks exactly the same.
- You Desire a Custom Page Layout: if your current WordPress theme doesn't support a specific page layout, you can upload an HTML file with the blueprint you want and customize it as needed.
Lastly, you might need to verify your WordPress website with Google Search Console and desire to use the recommended method of uploading a Google HTML verification file to do then.
The way your website appears in search engines, particularly a big one like Google, plays a part in your success as a website owner.
That'southward why tools similar Google Search Console exist. With Google Search Console, you guarantee that Google will index and rank your site in relevant search results, all in the hopes of making it to the outset page.
Google Search Console also provides you information about your current SERPs (search engine effect pages), so you can improve your SEO efforts and earn more clickthroughs to your site.
The thing is, to utilize Google Search Console, you need to verify your WordPress website. And it just so happens that 1 of the all-time ways to do this is to upload a Google HTML verification file.
Now, permit's accept a expect at the different means to upload an HTML file to WordPress.
1. Method: How to Upload HTML File to WordPress in the WordPress Dashboard
The first method for uploading an HTML file to WordPress we'll wait at involves the WordPress dashboard.
You'll need nothing more the backend of your website and an HTML template to consummate this procedure since you'll exist uploading the HTML file straight through a post, page, or the Media Library.
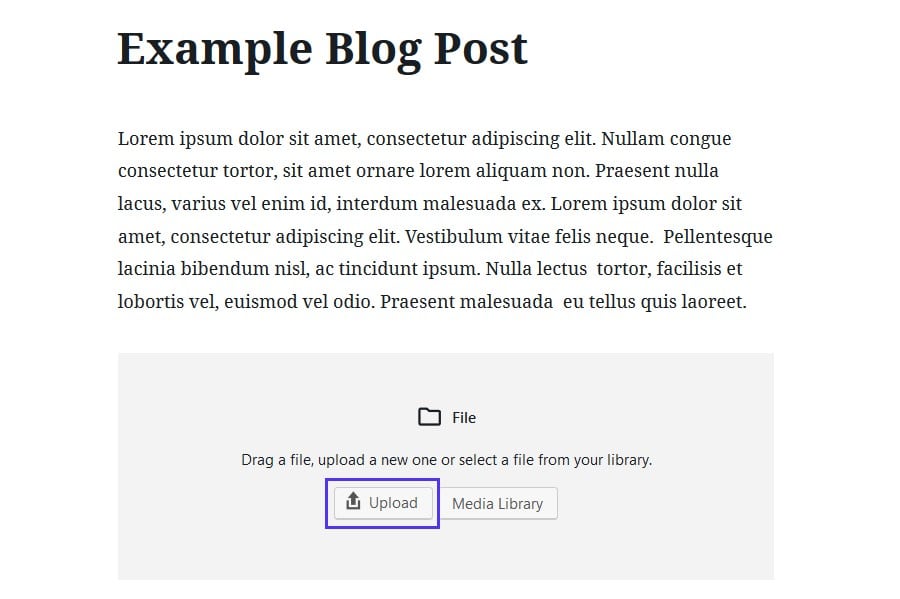
To upload an HTML file through a postal service or folio, insert a 'File' cake in the Gutenberg Editor. And so, click Upload to upload the HTML file.
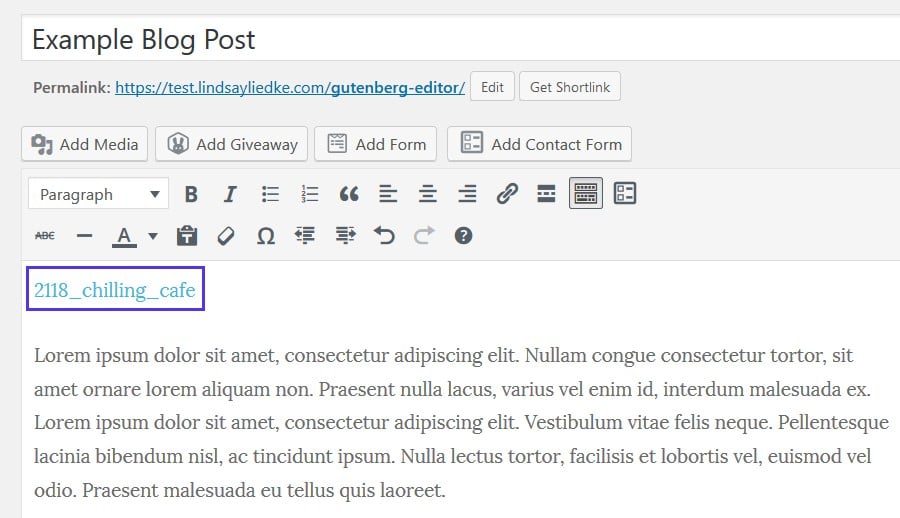
Here'south what information technology looks like if you've disabled Gutenberg and are using the Classic Editor. Just click Add together Media so Upload to upload your HTML file.
Choose the HTML file you desire to upload and then click Insert into post. Doing this inserts the link of the file into the mail service or page and automatically saves it to your Media Library.
You can skip uploading the HTML file to a post or page in WordPress and upload information technology directly to your Media Library. Click Media Library in the WordPress dashboard, and then Add New, and choose the HTML file from the place you accept it saved (e.thousand., your figurer, hard bulldoze, or external storage).
Keep in listen, you lot might run across an error when you upload your HTML file while using Gutenberg. This is what information technology will look like:
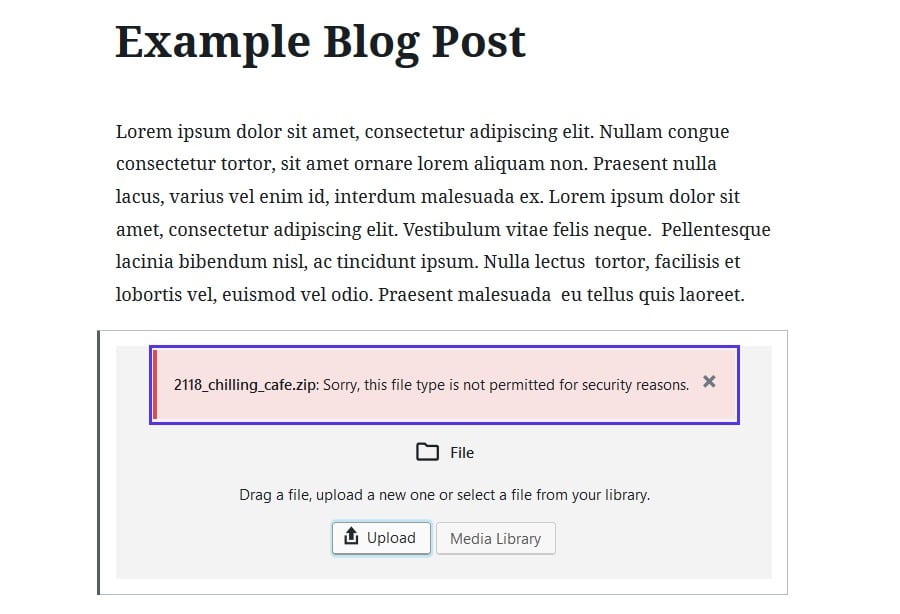
Check here for detailed instructions on how to fix the "Sorry, This File Type Is Not Permitted for Security Reasons" Fault in WordPress.
2. Method: How to Upload HTML File to WordPress Using an FTP Customer
Uploading HTML files through the WordPress dashboard is the virtually straightforward method. Nevertheless, for large templates fabricated up of multiple files, information technology's best to use an FTP client such every bit FileZilla.
Using an FTP client is likewise helpful for times you lot want to piece of work locally on a test site before pushing any changes you lot brand to your live site. This volition prevent whatsoever unnecessary downtime if something goes incorrect.
To showtime, e'er create a fill-in of your website first because yous never know what the HTML file might practice when you lot upload it to your site.
Next, open up your FTP client.
Now you'll need to connect to your web host account by entering your FTP credentials. This information is usually establish in your spider web hosting business relationship. If you have trouble finding it, reach out to your host and accept them help you.
Subscribe At present
If you apply Kinsta hosting, first log into your MyKinsta account and click on Sites in the dashboard and and so on Info to get the credentials needed.
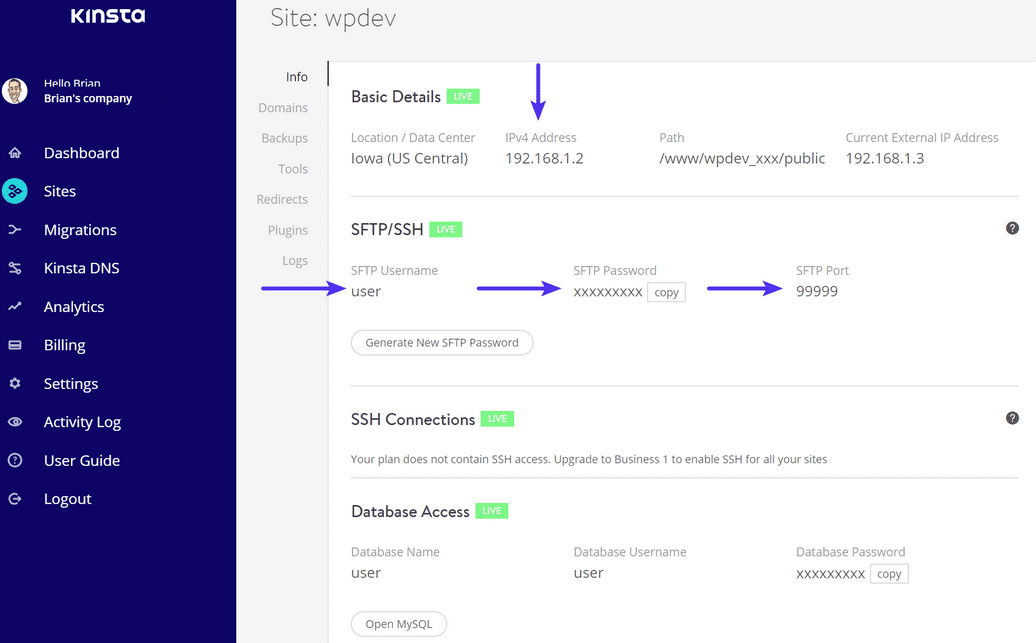
When you practice this, you should see your credentials under SFTP/SSH. You'll need your username, password, and port.
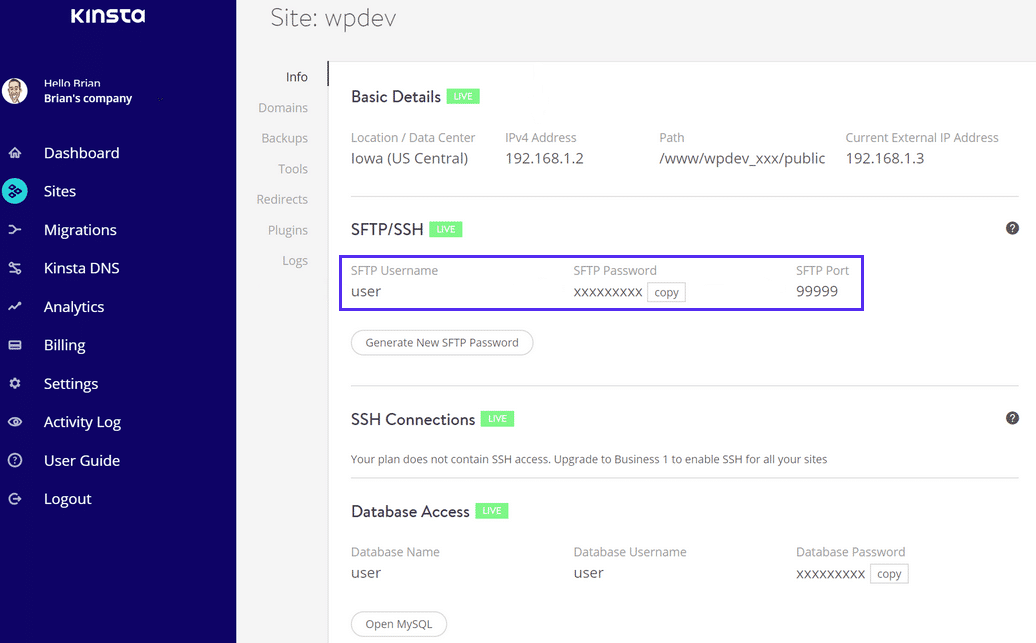
Here'south the information you're going to demand to enter into FileZilla:
- Host: your site's domain name preceded past "sftp://". For example, you'll need to enter sftp://www.mysite.com.
- Username: from your MyKinsta dashboard
- Password: from your MyKinsta dashboard
- Port: from your MyKinsta dashboard
This is what it will await like at the peak of the FileZilla screen:

After y'all've entered your credentials, click Quickconnect.
Now it's fourth dimension to upload the HTML file from your computer to WordPress. Beginning by navigating to your website's root folder (which contains the wp-content binder, the wp-config.php file,etc.) on the correct side.
Then, become to the left side and find the HTML file y'all accept saved. When you find information technology, right-click it and select Upload to add it to your website. To see all hidden files in Filezilla follow this brusque tutorial.

You'll see the file has successfully been uploaded to WordPress. To check to brand sure it is visible on your website, type your website's URL into your browser and add the name of the HTML file to the terminate. For example, it might look like world wide web.mywebsite.com/html-file.
When you do this, you'll be redirected to the new webpage you've created with the HTML file.
3. Method: How to Upload HTML File to WordPress Using cPanel
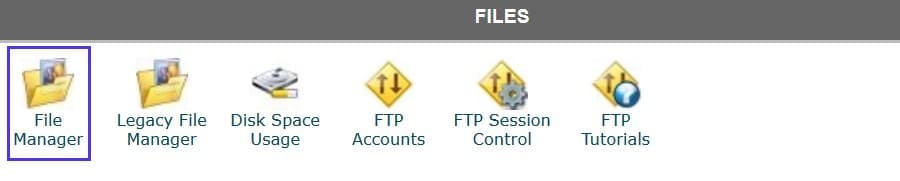
The last method we're going to share with you involves using cPanel and the File Director to upload an HTML file to WordPress.
Showtime past logging into your hosting account's cPanel and accessing the File Manager.
Once y'all're in the File Manager, yous take two options:
-
- Create a New Folder: create a new folder in your site's root binder to upload your HTML file to.
- Upload to Root Binder Directly: rather than create a new folder, upload the HTML directly to WordPress. If this is how yous desire to do it, unzip the HTML file where you take it saved, change the index.html folder to something new, and then rezip the file to continue uploading to WordPress. If you don't, the HTML template will override your site's homepage.
For this example, nosotros'll create a new binder since there are a few added steps when y'all do this.
Create a New Binder and Upload an HTML File to WordPress
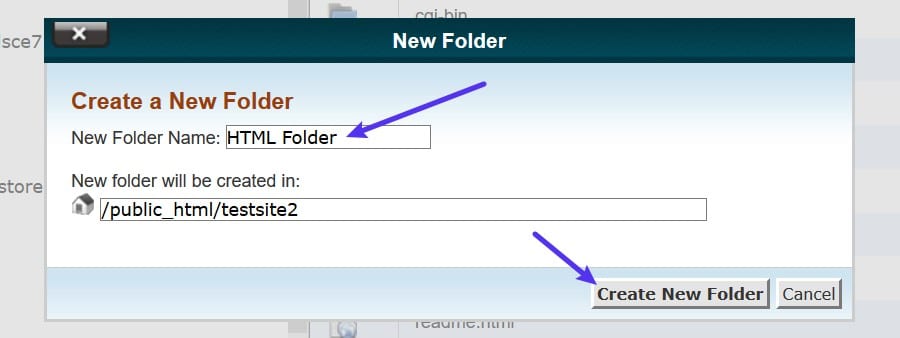
Kickoff, navigate to the root folder of your website (which contains the wp-content binder, the wp-config.php file,etc.). And so click New Binder.

Name your new folder and click Create New Binder.
Double click on the folder you just created and then click Upload to select your HTML file.
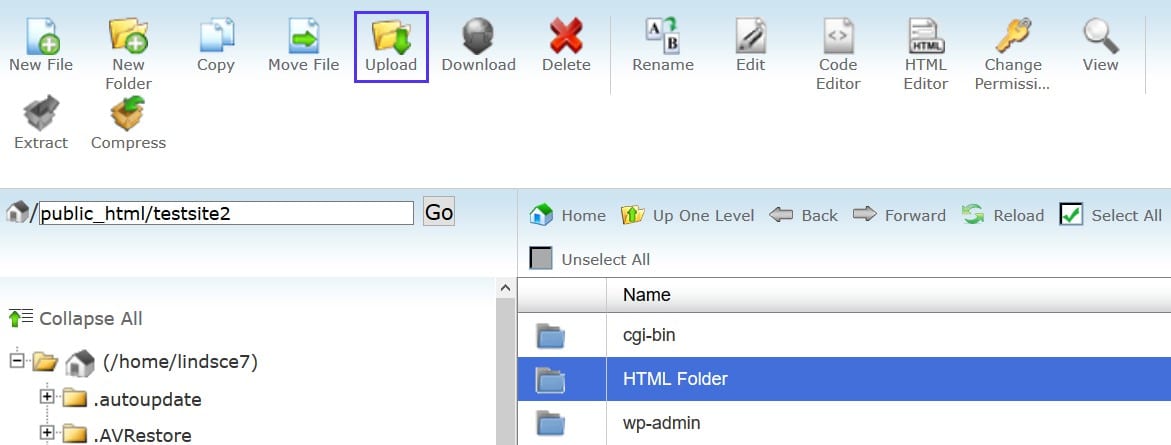
Once this is done, you'll see your zipped HTML file in the folder.

Now y'all need to unzip the HTML file by right-clicking and selecting Extract.

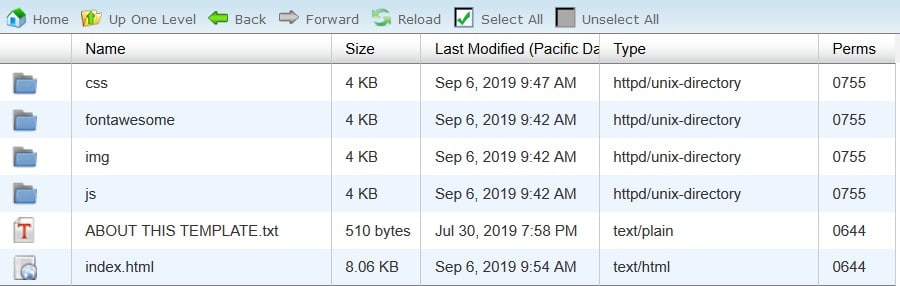
When the modal window pops up, click Extract Files to finish the unzipping process. When the HTML file has been unzipped, you'll see all the different files included in the template. Retrieve this means you'll encounter things like CSS, font style files, images, and JavaScript.
Now all you have to practise to make sure the HTML template and files were uploaded is type your site's URL into the browser and add the new folder's proper name to the finish.
If you run into a 404 error, don't worry. This is a common WordPress fault and tin be resolved hands.
If your server doesn't back up redirection, and the index.php file is not redirected on loading the URL in your browser, yous'll see a 404 error after uploading your HTML files.
To fix this, stay within the File Manager and access your .htaccess file by double-clicking it. And then, add the post-obit lawmaking and relieve your changes:
RewriteRule ^(.*)index\.(php|html?)$ /$1 [R=301,NC,L] This code will redirect your index.php file and load it in the browser.
Summary
WordPress is the near used Content Direction system effectually because it gives website owners the flexibility needed to create unique websites that stand up out from the contest. Existence able to upload an HTML file to WordPress using any of the above-mentioned methods is merely another example of how WordPress caters to the needs of site owners and gives them the freedom to customize their sites equally needed.
Plus, knowing how to upload an HTML file to WordPress is just a good skill to have in case the demand arises. After all, you never know when you might come up across an HTML template you dearest or need a certain blazon of page layout that your theme doesn't support.
Save fourth dimension, costs and maximize site performance with:
- Instant assist from WordPress hosting experts, 24/7.
- Cloudflare Enterprise integration.
- Global audience reach with 29 data centers worldwide.
- Optimization with our built-in Application Performance Monitoring.
All of that and much more, in one plan with no long-term contracts, assisted migrations, and a 30-twenty-four hours-money-back-guarantee. Check out our plans or talk to sales to notice the plan that's correct for y'all.
Source: https://kinsta.com/knowledgebase/how-to-upload-html-file-to-wordpress/
0 Response to "How to Upload Multiple Html Documents to Website Using Cpanel"
Post a Comment